An ontology field has several parameters that need to be set up to extract its value from the given document. These parameters include field name, field type, keywords, rules, etc.
Note:
If you encounter any issues, contact your system administrator.
You can set up an ontology field using the following steps:
On the document ontology page, click on the ontology field for which you want to set the details. The field ontology page opens with two tabs Field Information and Rules.
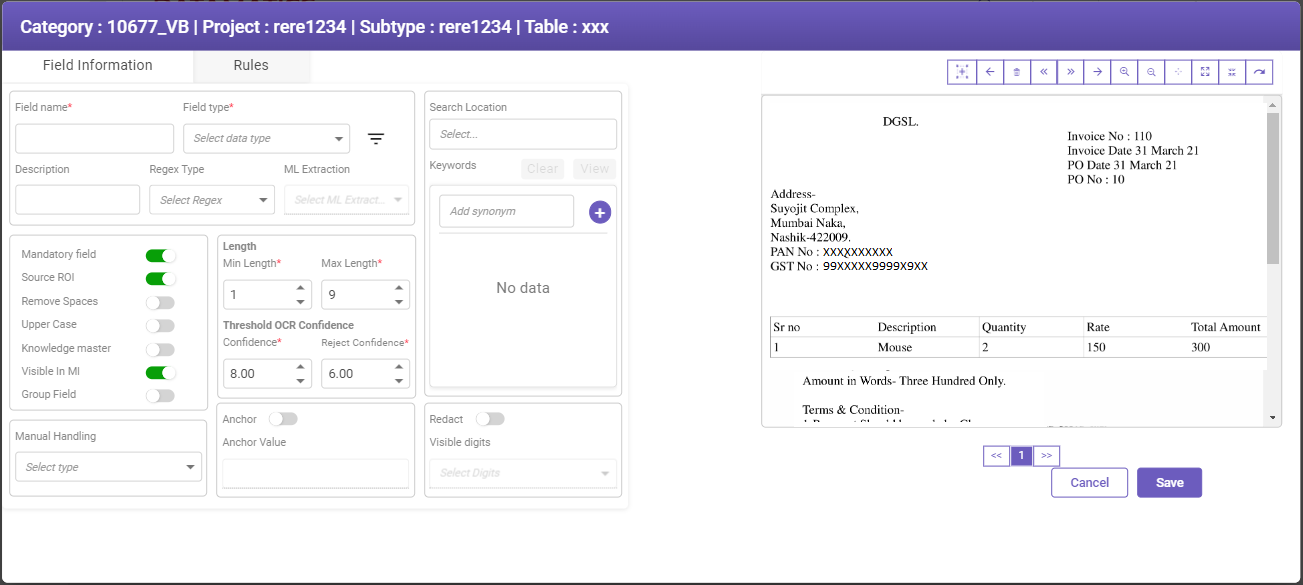
Click on the buttons inside the tabbed menu to know more.
The Field Information tab includes features used for general configuration and the document viewer, including the preview pane used to mark the ROI.
Under Field Information tab, fill-in the details based on the following field descriptions.
|
PARAMETER |
DESCRIPTION |
|---|---|
|
Type the field name. Note If you update the field name, then you must also update the export name set for the field in the output transformation tab. |
|
|
Two types of field types are defined: regular field types and business types. For more information, see Field Types section.  Field type as Source Name If the value of the field type is set to Source Name, then the data for the field (and the derived fields based on this field) get extracted using ML models available in the application. Extraction based on ML models can be faster and reliable as compared to regular OCR based extraction if well-trained models are used. (See TruCap+ Studio.) Mapping fields based on region and domain
Business documents have fields specific to a region. This feature enables you to map business fields based on region and domain for better data extraction. The purpose is to display only those fields generally used for business documents for a particular region. Follow the steps below to map the fields:
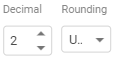
Note When you select Numeric as the field type from the drop-down list, two additional non-mandatory fields, namely Decimal and Rounding, are visible (see the image below).
Select the decimal value (Range from 1-9) and Rounding option (Available options are Up and Down) from the respective drop-down list. By default, 2 is selected for Decimal and Up for Rounding field. |
|
|
Description |
Type the field description. |
|
Regex Type |
They are pre-configured regular expressions for the business type used to search and extract data from a document. There's the default business type, which already has regular expressions set. Users can select the regex type for the required field type. (See Defining Extractions.) Note When you select a business field type, the related regex type automatically gets selected. |
|
Select the ML attributes from the drop-down list to extract the data using ML Model. Note Only the ML attributes for the selected document class are displayed in the drop-down list. |
|
|
Mandatory field |
Click to turn on and turn off. Turning on to active mode, enables the defined field name to be considered as a mandatory field during data extraction process. Turning off to inactive mode, considers the field name as a non-mandatory field during data extraction process. |
|
Source ROI |
Enable the toggle switch to indicate that an ROI is available for the field. |
|
Enable the toggle switch to consider the set field type as the splitter field to auto-split the document into the number of pages set at the sub-type level. |
|
|
Remove Spaces |
If this toggle switch is enabled, the unwanted space from the extracted value is removed. |
|
Upper Case |
If this toggle switch is enabled, the extracted value gets auto-corrected into uppercase if any value appears in lowercase. |
|
Enable the toggle switch, if you want the respective field name to appear under Header section. If you disable the toggle switch, the respective field name, by default appears under Footer section. |
|
|
Knowledge master |
If this toggle switch is enabled the data is fetched from the knowledge master. |
|
Multi-Line |
Enable the toggle switch if you want to view the field data as multi-line text in MI and QC. By default, this option is disabled. Note
|
|
Default Value |
Enable the toggle switch to enter a default value to be shown if validation fails for any reason for the field. When you enable the toggle switch, a text field is visible; enter the default value to be displayed in case the validation check fails for that field. |
|
Visible in MI & QC |
This toggle switch is available only for table fields that are created under Detail section. If toggle switch is enabled, the field will be visible in the table grid of the MI & QC page. |
|
Group Field |
This toggle switch is available only for table fields that are created under Detail section. If toggle switch is enabled, the field will be available as a group field. |
|
Length |
Min Length*: Indicates the minimum characters that are allowed for a field name. Max Length*: Indicates the maximum characters that are allowed for a field name. If the extracted field values are more than the defined maximum length, the validation gets failed. Note For Aadhaar and PAN field types, the minimum and maximum character length auto-populates |
|
Threshold OCR Confidence |
Confidence: Confidence level measures the true accuracy of the character. If the extracted field confidence level is equal to or more than the defined confidence level, then validation gets passed. Type or select the confidence level from the range of 0 to 9. For example, Reject Confidence: If the extracted field confidence level is equal to or less than the defined confidence level, the validation fails and field gets rejected. Type or select the confidence level from the range of 0 to 9. For example, |
|
Indicates what action needs to be taken during manual intervention process. Select the required option from the drop-down list. The available options are - Stop, Read only, Not required, and Stop and confirm. |
|
|
Anchor |
Click to turn on and turn off. Turning on to active mode, enables the defined field name to be considered as a anchor field during data extraction process. |
|
Anchor Value |
Indicates the anchor value which is used to measure the coordinates of the page. It is mandatory for user to mark ROI under Region of interest field option. |
|
Turn on the toggle switch to hide the sensitive information (such as Aadhaar number, account number, etc.) completely or partially during extraction. The redacted digits/characters will be covered with a black box. (Also see Visible digits.) Note
|
|
|
When you enable the redact toggle switch, you can specify the number of allowable digits/characters in the field shown to the user. (Also see Redact.) |
|
|
Search Location |
Indicates the location where field keywords are to be searched. The available options are - Right, Left, Top, Bottom, Right Bottom, and Right Top. |
|
Keywords |
In the Add Synonyms text field, enter the synonyms to be used to find the required data. Refer Adding synonyms for more details. Note
|
|
Note: Field marked with * are mandatory. The document will be sent for manual inspection in case a validation fails on mandatory field. |
|
 next to the Field type parameter. The Region and domainwindow opens.
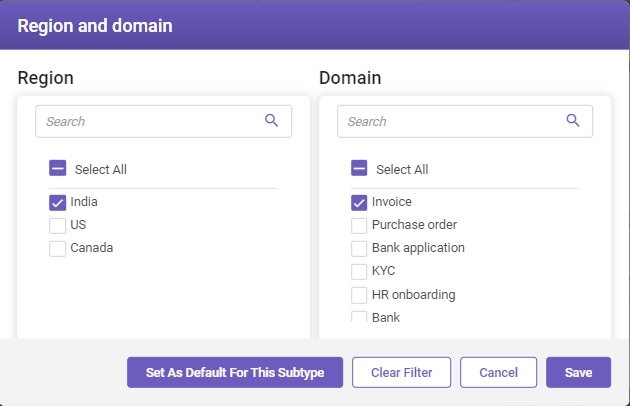
The Rules tab enable you to set rules for data extraction, validation, etc. Rules are an important part of the ontology that determines the process to be followed for data capture. A rule typically consists of extractions, validations, and data clean-up rules applied in a specified order.
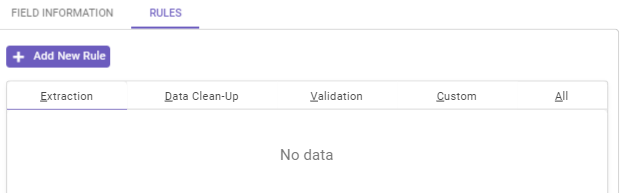
Under Rules group following tabs are present.
-
Extraction (to add an extraction rule)
-
Data Clean-Up (to add a data clean-up rule)
-
Validation (to add a validation rule)
-
Custom (to add a custom rule)
-
All (to display a list of user applied rules)
It should be noted that rules available under a given rule are applied in the following order:
Extraction > Validation / Custom validation > Data clean-up
In the Rules group, select the required tab under which you want to add a rule and then click +Add New Rule button.
When you click +Add New Rule button, the corresponding rules window appears.
For example, if you have clicked +Add New Rule button under Extraction tab, The Extraction Rules window opens. The page lists all the extraction rules that can be applied to the given field.
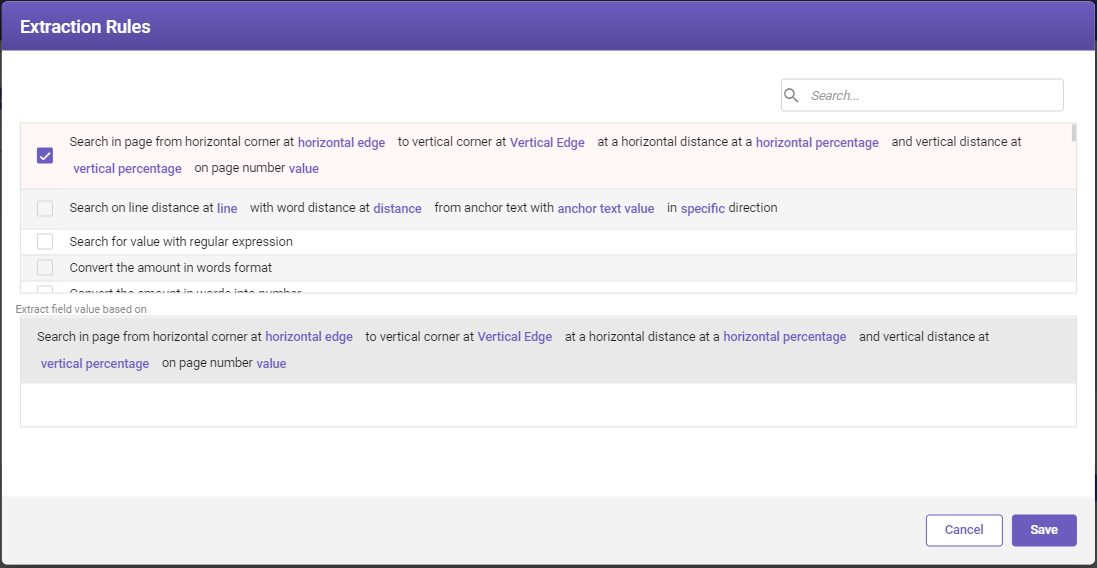
Select the required rules from the given list. The selected rules appear in the Extract field value based on panel below the list. A given rule may require one or more parameters (that appear as highlighted text in the rule statement).
Select the highlighted text in a given rule in the Extract field value based on panel to provide a parameter value. A Parameter Value window will open. In the Parameter Value window, provide the required values and click Save.

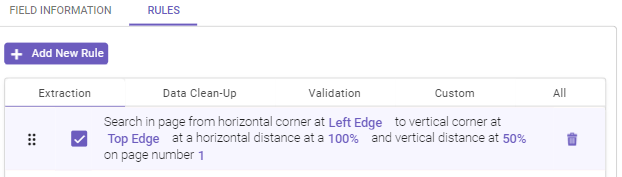
The selected extraction rule becomes available in the Extraction tab. You can also delete the added rule by clicking the delete icon corresponding to the rule.
Note:
For detailed information about all the available rules, see Defining rules.
The keywords section enables user to add, delete, and rearrange the synonyms related to the field name of a particular subtype.
Note:
During data extraction process, the priority is given to the first synonym which is available in the list. In case, if no accurate results are found from the first synonym, then the other synonyms are given priority in a sequential order.
In Add synonym field, to add a synonym, type the synonym, and then click the  icon. Alternatively, you can add multiple synonyms using a comma separator (,). Once you add and click the icon, the synonyms automatically gets added.
Note
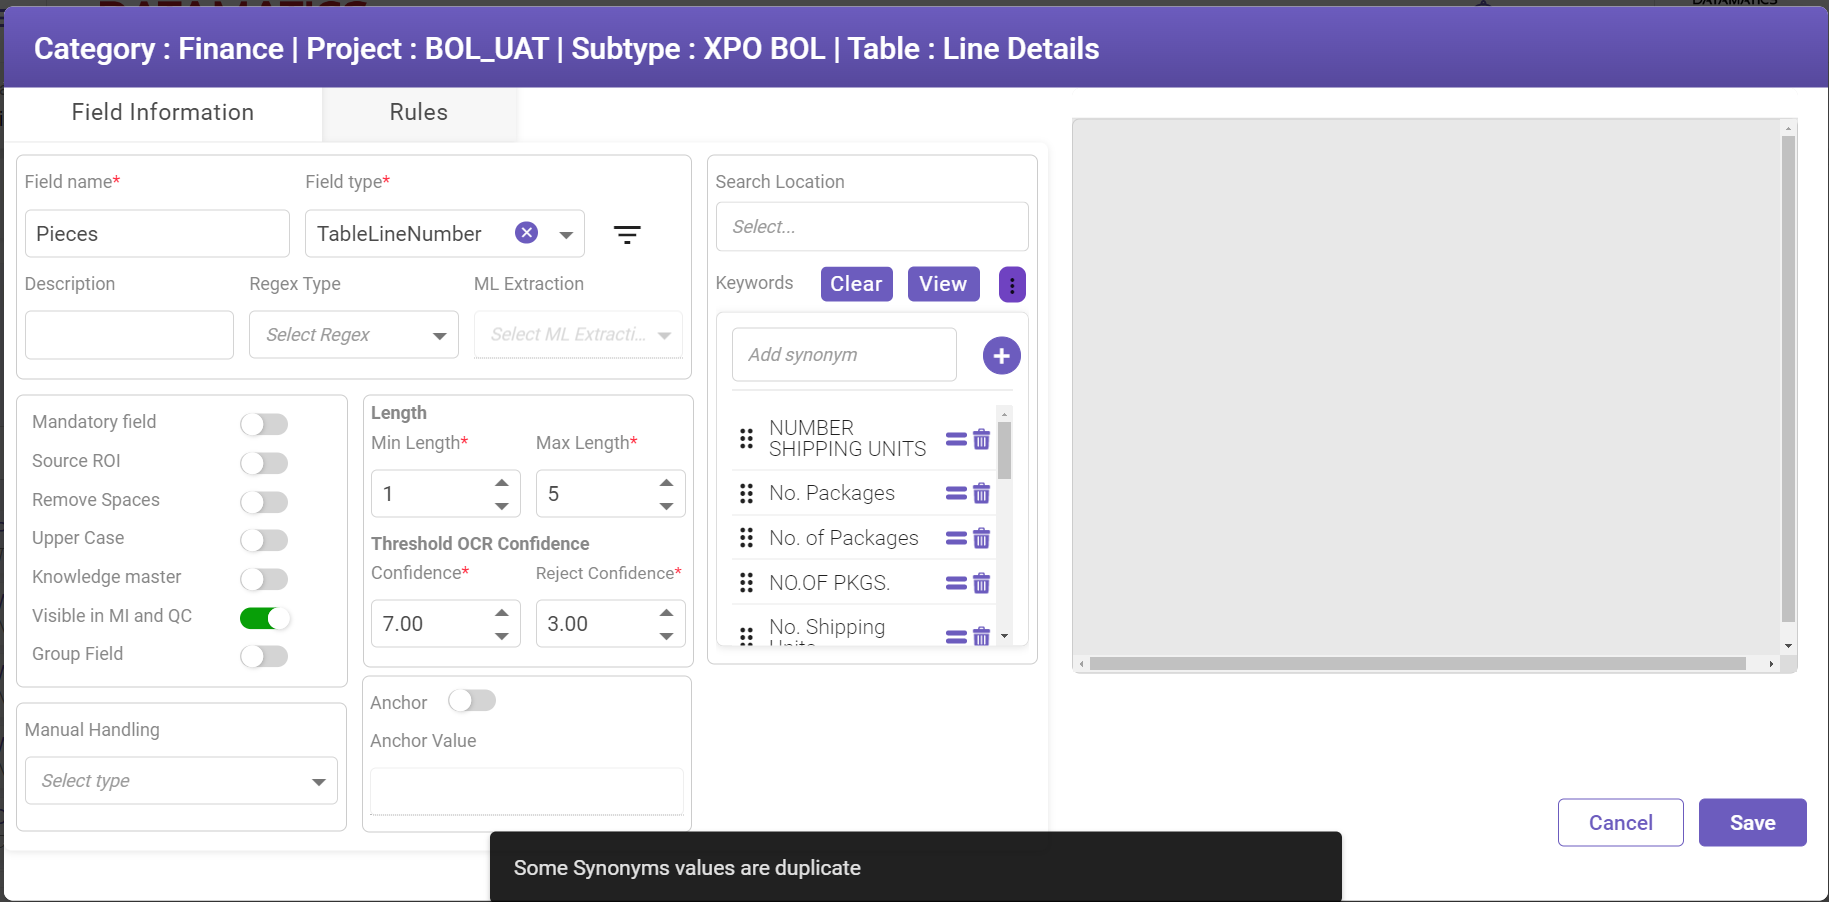
While adding multiple synonyms, if a synonym already exists, a toast message is displayed saying, "Some Synonyms values are duplicate" (see below image).
To view all the added synonyms for a particular subtype, click  . A pop-up showing all the added synonyms is displayed.
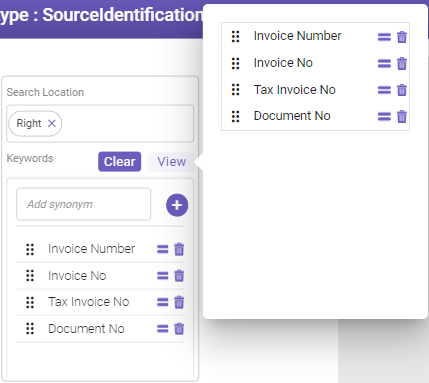
Choosing a direction for keyword search
While adding synonyms, users can choose the search direction. The direction can be different for each synonym.

When you click the  icon, the following options appear.

-
Begin with: Performs search and extracts value from the beginning of the phrase. NOTE
-
Contains: Performs search and extracts value from anywhere in between the phrase.
-
End with: Performs search and extracts value from the end of the phrase.
Drag the  icon to move the entries up and down to rearrange the sequence of the displayed synonyms.
Deleting a single synonym
To delete, click  icon against the synonym you want to delete.
Deleting all synonyms
To delete all the added synonyms, click  . A Clear all keywords pop-up message is displayed.

Click Yes to delete all the added keywords.
-
In the Document viewer, you can mark an ROI for the field and navigate the document apart from other activities. (A sample document must be available for preview to set the ROI. Use the document ontology page to upload a document.)

You can use the available features based on the description provided in the table below.
SYMBOLS
DESCRIPTION

Select Mark to mark an ROI for the field. (Only single ROI can be marked for a field.)

Select Delete to delete an ROI.

Select either Zoom in or Zoom out to zoom the preview page.

Select them to navigate the document.

Select to set the page to fit the page size.

Select to set the page to fit the preview pane 
Select to view the page in its original size. 
Enables to rotate the image in a clockwise and counter clockwise direction.

NEXT
Now that you have created fields, let's see how to define rules.
Useful links
Integrated documents processing